Thursday, July 4, 2013

Bedroom Makeovers


I can't believe how long it has been, a lot of exciting things have happened. My oldest daughter moved into her first apartment. She also was offered an internship at Dell. I am so extremely proud of her. She is on track to graduate from ASU next spring. It will have only taken her three years to earn her bachelors. Way to go Laine.

My youngest daughter Emily was accepted into LIM fashion design school in Manhattan, NYC. She will be leaving in August. This year in her fashion design class she competed in a Recycle and Redesign FCCLA competition. Her challenge was to design a garment from recycled materials. The items she chose to use for her garment included: coffee filters that were stained with tea, burlap, old sewing patterns, and tapioca pearls.
It was absolutely beautiful and evidently the judges thought so as well. She took First Place. Again, I am such a proud mamma! 


I can't believe I won't have any kids at home beginning August. Boy how time flies, I remember when they were just little munchkins.

What have I been doing with my time you ask. Well, Emily wanted to makeover her room about six months ago. I am always up for a makeover. She had decided to rid her room of dark brown paint with pink polka dots for a more sophisticated grey and white scheme.


The empty bedroom that was my oldest daughters bedroom I opted to stencil. I had long been admiring a stenciled room done by Jones Design Company. http://jonesdesigncompany.com/decorate/painted-wallpaper-a-tutorial/


I am not gonna lie. It is very time consuming, but the end results are well worth it.
I absolutely love it!!


I will post pics soon of both rooms completely finished.


Sunday, April 22, 2012

Boy, how time flies. I can't believe it has been eight months since my last post. Just a quick update before I share my latest project.

My daughter Laine will be finishing her first year of college this week and moving back home. YAY!! She changed her major and is now a chemical engineering student.  It will definitely be harder work, but I know without a doubt she will excel. She is a smarty pants :)

 My other daughter Emily will be finished with her Junior year in high school next month.  She took first place in a newspaper fashion challenge back in September, and her fashion design class just had a fashion show that showcased all the students designs.  She rocked it. I am so incredibly proud of her.

As of lately, I have been busy painting all the doors and woodwork in our home a nice crisp white instead of the dirty white the builder used.

I made over our laundry room last month. I ripped out the builders shelf and replaced it with shelving from Ikea.  I love it. Sorry no before photos.


I made myself a piece of subway art.


Yesterday I made my friend some embellished dish towels that have been popping up on Pinterest. I thought they would make a cute birthday present.


I promise not to go eight months before posting again. :D

Tuesday, August 23, 2011

Monogram Sign

I can't even begin to tell you how happy I am to be finished with my chair, but in the same breath I always have to have a project going.

Thankfully it didn't take me long to figure out what to do next.

I had seen a wooden wall sign on a recent trip to a local boutique, but there was no way I was going to shell out $200 for it.

I had to figure out a way to make my own version.

It started off with a frame I found in my neighbor's trash.

I sanded it and painted it with leftover paint from my powder room makeover, BM Grey Owl. I then wiped RL tea stained glaze over that.

The actual sign part required a trip to Lowe's for a piece of pine.

I cut the pine board to fit inside the frame and then painted it with my free linen white paint from Glidden.

The stencil I created on our home printer.

The finished project cost a total of $8.00


Thursday, August 11, 2011

My $20 Craigslist Chair Makeover

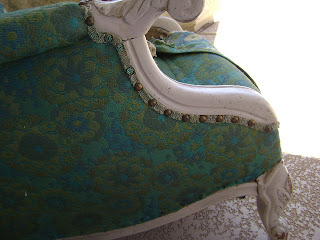
I bought this antique chair off Craigslist over a year ago brought it home put it in the garage and put it out of my mind.


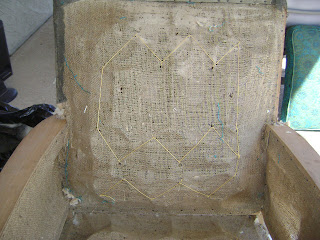
This past week I decided I should do something with it, so the first thing I did was strip it down to the springs which I noticed needed to be retied.


Luckily, I had remembered my sister sent me a book on reupholstering months before, and fortunate for me there was a chapter on retying springs. YAY!!!!

This little book became my best friend for this project.


Once the springs were tackled I moved onto covering it with fabric.


Can you guess what kind of fabric I used?

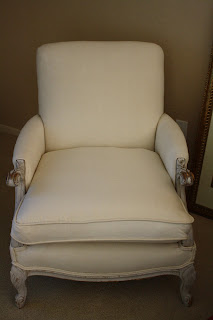
I used dropcloth.
I absolutely love the end result.

P.S. linking to:
Furniture Feature Fridays
Feathered Nest Friday@frenchcountrycottage

Show and Tell Friday@romantichome
Saturday Nite Special @funkyjunkinteriors

Thursday, March 10, 2011

Office Makeover

I decided to makeover our office this week. I painted the office when we first moved in, and it hasn't changed since.

Don't get me wrong I love the green paint, but I am now drawn to lighter colors.

I am an avid follower of the Lettered Cottage and I have long since admired their paint treatment in their reading room.

With that being said, I chose to try and duplicate their horizontal stripes.

I chose two colors by Olympic paint, Navajo White and Classic Khaki, with the Navajo White being the base color.

I now had to decide on how many khaki stripes I wanted. Five was the magic number :) I used a formula I found on http://www.younghouselove.com/2009/06/walking-the-line/ to determine the width of my stripes.

With the width figured out I could now commence with painting, first I painted the walls my base color of Olympic Navajo White.

Then I invested in one of these nifty gadgets, an auto level laser to make sure my stripes were level.
I highly recommend one of these if you want to keep your sanity. I have yet to find a level wall in our house.


Once my stripes were done, I went ahead and painted over the tape to make sure the seal was nice and tight. Our walls are textured and I did not want the khaki paint to bleed underneath.

I ended up putting on two coats of khaki paint for the stripes.
The key to keeping the darker paint from bleeding underneath the tape is pull off the tape while the second coat of paint is still wet.

Okay I know your dying to see it finished, so here it is.


I absolutely L.O.V.E. it.


Linking to:


Monday, January 10, 2011

Armoire Makeover is Complete

I can't believe another month has passed since my last post.

Anyways, I have finally finished my armoire makeover.

I decided to prime it with some free paint Glidden ever so nicely sent me. It is called Linen White.

Once I was finished priming, I then busted out the actual paint color the armoire would be. Benjamin Moore's Revere Pewter.


What do you think? Definitely not Southwest looking anymore, huh!!

Here it is in the very beginning stages of the transformation

Here is the lovely southwest carving I was in the midst of getting rid of.

I have to say I like it much better now.

Now on to my next project.

Linked to

Tuesday, December 14, 2010

Exciting News!!!!

I can't believe it's been a month since my last post. Where does the time go? Since my last post I have some very exciting news to share. My daughter was accepted into ASU and she also received a Presidential Scholarship. We are so very proud of her.

Now if you remember I was prepping our Armoire for a make-over, needless to say it still looks the same. I am wanting to paint it a grey color as to resemble a piece of Swedish furniture, but trying to find the right shade of grey that is not too blue, or green but a true grey is proving to be difficult.

What is one to do when they can't find the perfect shade of paint, move onto another project of course.

With Christmas around the corner, I decided to make ornaments for ornament exchange parties I attend every year.

The first ornament I made started with an ornament for the Dollar Store. You gotta L-O-V-E the Dollar store. I then went and dug a book out of the donation pile and grabbed my hot glue gun.

I cut the book pages into 1" squares.


Wrap paper square around the end on an un-sharpened pencil


Add a dab of hot glue

Attach to Plain Christmas Ornament (starting at bottom)
I actually sat the ornament on a glass while attaching paper squares.

Once the ornament was completely covered in paper squares, I cut out a cardboard star, painted it green, then smeared Elmer's glue on it and covered it in green glitter.


The finishing touch was the banner and brushing the tips of paper in glue and rolling in glitter.

This is the other ornament I made, which I can provide a tutorial for if you would like.

May you all have a very blessed Christmas